
Managing Members
Managing members is how you build your organization's roster — bringing in co-instructors and students, and managing the people who already have access. Only managers (the owner and admins) work with the roster, and a few actions are reserved for the owner.
How People Join Your Organization
There are two kinds of people in an organization, and each arrives a different way:
- Admins (co-instructors) are invited by email by the owner, and join once they accept the invitation.
- Students (members) are not added directly — they join by being invited to a group (through an invite link or email), or by launching DojoCode from your LMS through LTI.
Why there's no "Add member" button
Inviting admins and inviting students are deliberately separate flows. You invite the small number of admins by email, one at a time, while students join at scale on their own through a group invite — so you never enter students one by one.
Invite an Admin
Use this to bring in a co-instructor or teaching assistant as an admin. You do not create admin accounts yourself: colleagues are invited by email and join when they accept.
- Inviting admins is owner-only. The Pending invitations panel and its Invite admin button appear only for the organization owner (the Business account). Admins do not see them, because only the owner can grant the admin role — see Roles & Permissions.
- Make sure the organization is your active workspace first. If no organization is selected, you'll be asked to select an organization workspace before inviting. See Switching Workspaces.
Send the invitation
- Open Organization → Users and click Invite admin at the top of the page.
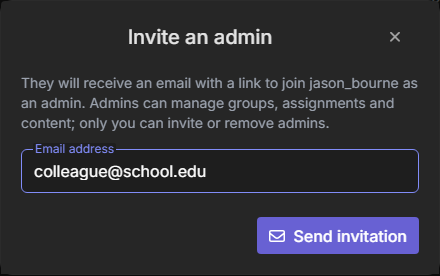
- Enter your colleague's email address and click Send invitation.
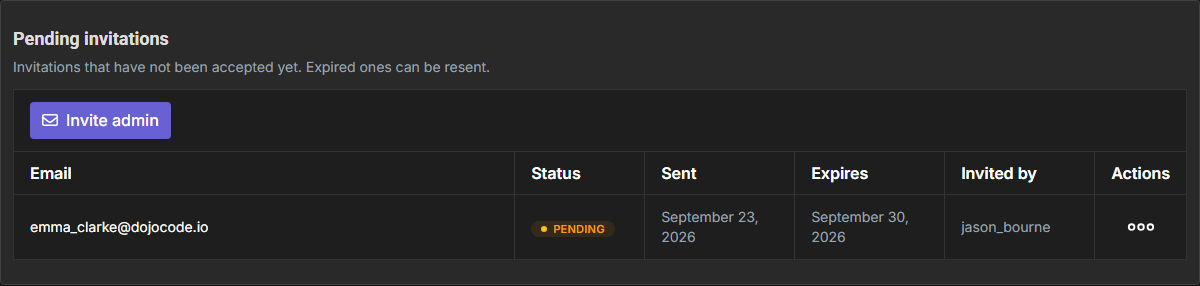
The invitation appears in the Pending invitations panel with its status, the date it was sent, the date it expires (seven days later) and who sent it. Each invitation also reserves an admin seat on your plan until it is answered, expires or is revoked.
What your colleague sees
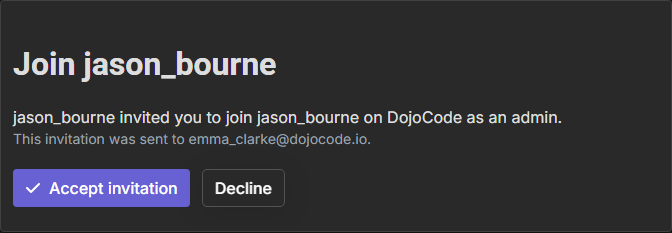
Your colleague receives an email with a link. If they already have a DojoCode account, they also get an in-app notification, and the link signs them in. The invitation page shows who invited them and to which organization:
- Accept invitation adds them to the organization as an admin and takes them to the dashboard, with the organization selected as their active workspace.
- Decline closes the invitation; you are notified either way.
- If they have no account yet, the page offers to create one with the invited email; once registered, they are added as an admin right away.
- The invitation only works for the invited email. Someone signed in with a different account is asked to sign out and sign in with the invited one.
From then on the new admin shares the managers' view of the organization's groups, students, and content, including everything created by other teachers.
Resend or revoke
The row menu of a pending invitation offers two actions:
- Resend — sends a fresh email with a new link, for example after the invitation expired. Expired invitations stay in the panel so you can resend them.
- Revoke — withdraws the invitation; the link in the email stops working.
Bring in Students
Students become members of your organization by joining one of your groups — there is no direct "add student" step in the Users panel. When a student accepts a group invite, they are added to that group and, because the group belongs to your organization, they automatically become an organization member.
You invite students to a group in two ways:
- Invite link — generate a group invite link and share it with your class. Students open the link, register (or sign in if they already have an account), and land in your group as members.
- Email invitation — enter your students' email addresses and DojoCode emails each of them an invite link to the group.
The full step-by-step is in Inviting Students. To create the groups that students join, see Managing Groups.
Students already on DojoCode
The same group invite works whether or not a student already has a DojoCode account. New students register through the link; existing students simply join. Either way they end up as a member of your organization.
Members Who Arrive Through an LMS (LTI)
If your class launches DojoCode from Moodle or Canvas, you don't invite students at all — the LMS launch enrolls each person into the organization automatically, mapping teachers to admins and learners to members. See Organizations & LTI.
Managing People on the Roster
From the organization Users list, managers can act on an existing user through the per-row actions menu (shown open in the screenshot above):
- Edit — open the user's account details.
- View Profile — see the user's public profile.
- Delete — permanently delete the user's DojoCode account after a confirmation prompt.
Delete is permanent
Delete removes the user's DojoCode account entirely, not just their place in the organization — you're asked to confirm first. There is no separate "remove from organization but keep the account" action, so use Delete with care.
Seats and Plan Limits
How many people you can bring in is governed by the owner's plan (see Overview → Plans and Seats). Limits are counted across the whole organization, not per instructor, so all managers draw from the same pool. If you hit a limit, upgrade the owner's plan or remove people you no longer need.
Membership Status
Each membership has a status (for example, active). Active members count toward your organization and appear in the shared views, letting managers tell apart people who are currently part of the organization from those who are not.
Next: Switching Workspaces to make sure you're always working inside the right organization.